

24 Must-Have Items for the Online Reseller
Updated 2/8/21
It’s confession time. When I sold my first few items online, I packaged them in Ziplock bags and recycled mailers before shipping them off. Stuffing would’ve been a better way to describe it.
Thankfully, I’ve come a long way since then. Now I have all the materials I need to package items nicely and ship them well.
So what do you need for smooth online sales and shipping? Let’s take a look. Everything that I use is on this list. I’ve added other things that I’ve seen sellers recommend and use with positive results.
Disclosure: This post contains affiliate links. This means that I may receive compensation when you click on a product link or purchase an item linked on this site. Click here for details.
** If you don’t have a Poshmark account, you can receive a free $10 bonus when you sign up with my code SFGIRL2015.
** On Mercari, you can get $10 when you sign up with the code JENMHM. The amount may vary by promotion.
Listing items online
1 | Camera
The first thing you’ll need is a camera. Your cell phone camera will do perfectly well.
Poshmark and Mercari work so well because they’re made for listing directly from your phone. If you have a cell phone with a decent camera, go ahead and use it because good is better than perfect.
Other sellers may use point-and-shoot or DSLR cameras, which can produce great results as well, but they’re not needed if you don’t have one.
2 | Flat sheet or boards
When I lived in a smaller place without great lighting, I used to make flat lays to list all my items. That would mean laying my items flat on the ground for pictures.
You want to have a nice background to do this well. If you don’t have anything else available, you can place the item directly on the floor or table.
I do this on occasion, but I don’t recommend it as you don’t want to give the impression that you put new or clean clothes on a potentially dirty floor.
Instead, use a poster board, foam board, or a flat bed sheet as a barrier between the item and the floor. These can provide visual appeal to your picture and item if it’s in a complementary color. It can also provide a solid background for a busy or detailed item.
Rug or blanket
Another option for the flat lay is to photograph items on household items like a rug or blanket. White rugs like this one are really popular right now and it’s no wonder why. They photograph well and make your items look glamorous.
I don’t feel they’re necessary to purchase because other options are available. You can use a blanket you already have. This is a nice white one similar to the rug.
I received a blanket similar to this one with one dark side and one light side as a gift. It’s good for providing contrast when taking pictures of dark and light items.
3 | Backdrop
The other option for you can use for a flat lay or modeled photo is to use a backdrop. White or light colored walls work well if you have that available to you.
If you need a background, you can use a large plain colored sheet or board or use backdrops like this wood one and this one as I used to do. They photograph really well.
They can be used as both floor and wall backdrops. You don’t even need a stand to keep them up. I’ve taped mine up with blue tape before.
4 | Dress form
Some sellers swear by the dress form AKA mannequin. This is especially great for items such as dresses and skirts. You’ll give the item some shape and show how it drapes.
I prefer a plain versus printed dress form so that it doesn’t clash with the item being modeled.
One problem of using a dress form may be that it’s one size (small) while your clothes are another (large). I don’t think an adjustable dress form is necessary.
Put the item on the dress form and clip the material where needed to make the item more visually appealing.
There are other types of dresses forms as well. The ones without the stand (body only) or plastic forms (without a back) may be cheaper.
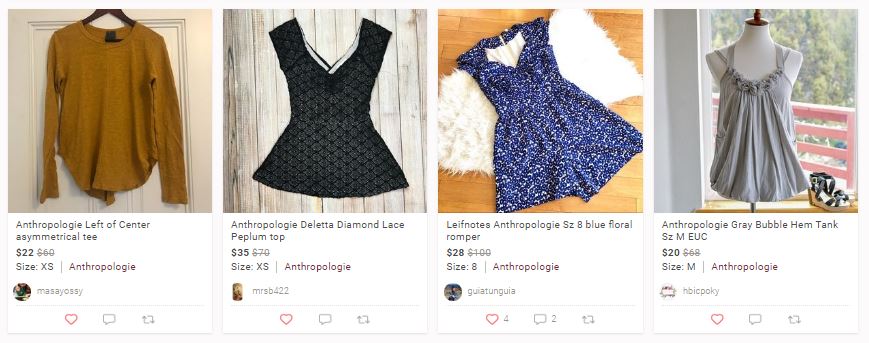
Various ways to showcase an item using (left to right) a hanger on the door, wood floor backdrop, white rug, and dress form.
5 | Light box
If you sell more variety of items like shoes, jewelry, wallets, and small home goods, you might want to invest in a light box to take bright pictures.
You can make your own following tutorials like this one. There are video tutorials on YouTube as well.
You can also purchase a light box if that’s easier for you. Before purchasing one, I would check the measurements of the box carefully and compare that to the items you sell.
If you sell small items like earrings, then the light box size doesn’t matter. If you sell a lot of boots, then you might have a hard time with a small box and need a bigger one.
6 | Measuring tape
A measuring tape is a must. I add measurements for just about everything that I list. Even if you don’t, you’ll come across potential buyers who will want measurements before they decide to buy.
7 | Stain remover
I’ve saved so many clothes by adding a bit of stain remover and throwing them in the wash. Shout and Tide are my favorites, but there are lots of types out there that will work on clothes.
If the stain is old, I soak the stain in Shout or Tide for at least 30 minutes and more likely a few hours before washing the item.
8 | Lint remover
You might have to lint roll items before taking pictures and before sending sold items to buyers. These lint remover rolls are so easy to use.
If you don’t want to use lint removers, you can dab the sticky side of a piece of tape on the item or wipe the item down with a lightly damp cloth to get rid of the lint.
9 | Dryel & a steamer
Sometimes a thrifted item will need to be freshened up before being shipped out. Dry cleaning is pricey, so dry clean items nicer items at home with Dryel. Items that can go in the washing machine get a wash and line dry so they’re ready for the recipient to wear.
An item might not need dry cleaning and can do with a simple steaming. This small handheld steamer is a easy solution.
I have a small one that lasts about 2 items before needing to be refilled. It depends on the type of material and how wrinkled the item is.
Some people prefer more heavy-duty steamers like this professional one because you can hang the clothes on the hanger and steam more clothes without having to refill the water. You’d get the steaming done faster.
10 | Lights
An easy way to photograph your items well is to use natural light. When that’s not possible, you can use lights and lamps from around your house.
Set up the lights close together with the lights angled towards the item you want to photograph. I’ve found that using artificial light can make my pictures yellow.
Try you use daylight bulbs if you have the option. Your pictures will turn out much nicer.
Lighting umbrella
For sellers who want to take their photography up a notch, this lighting kit has everything you need and is a great value.
It comes with two umbrella lights, which I prefer when I have to use artificial lighting or a ring light. I used one for a short time before returning the kit because one of the lights did not work.
Ring light
I currently have a ring light, which I use when I have to take pictures on dark days or at night. It’s good for when I make videos too, but not as good as natural light. I use this ring light, which I got when it was on sale.
11 | Editing apps
Editing apps are essential to my listings. There are many apps out there that will improve your photos. Many are free or cost a few dollars.
My favorite app is Snapseed. It’s free and easy to use. I mostly use it to crop my pictures and brighten them if they’re too dark.
A few others that I commonly hear about are PicTapGo, FotoFuze, Photo Room, and Adobe Lightroom.
I’ve used FotoFuze to remove the background of images. Photo Room got good reviews for doing the same thing.
My advice is to try out several of these apps and see which ones you like the best.
I used a photo editing app to combine these images.
Packaging items to ship
12 | Mailers
Mailers are an easy way to ship clothes and accessories. They’re thin, lightweight, cost efficient as well. I use bubble mailers most of the time so that buttons and zippers are protected, but you can use these plain shipping bags or even fun ones like these mailers with flamingos or these ones with pineapples on them.
Dog print mailers (so cute!)
French bulldog mailers (I have these!)
13| Boxes
USPS provides free boxes and envelopes when you use their Priority service. I order several different sizes of boxes in packs of 10 to 25 so I don’t have to use time stopping at the post office to pick them up. You can reuse boxes you get in the mail as well. If you’re trying to save money, I recommend using free boxes as much as possible so you don’t have to waste money on them.
14 | Scale
A scale is essential so you know how much to charge for shipping. On apps like Poshmark, you have a limit such as 5 pounds and very rarely will a single item go over it.
But if you sell on places like eBay, every ounce counts. You can end of charging too much or paying too much out of your own pocket for shipping if you guess how much your packaged item weighs.
The type of scale you’ll need depends on what you’re selling. Make sure it shows weight at least down to the ounce.
Small - I used to use a small food scale because that’s what I already had at home.I lived in a small space and didn’t want to buy another larger scale. If I had something bigger to weigh, I would put it in a bowl or on something that was narrower at the bottom but could hold the item. Then I could see the weight.
Medium - Now I use this cute pink scale, which works better because it has a bigger platform. I sell mostly clothes and shoes, and this does the trick.
Large - If you’re selling heavy or bulky items like electronics and large household goods, you’ll want a larger scale like this one that goes up to 110 lb or this one that goes up to 360 lb.
15 | Tissue paper
Tissue paper is a nice touch to packaging an item although not necessary. I fold items that fit into tissue paper to make it seem like a gift. I use white most of the time and color for holidays. Note though that color can transfer onto items, particularly when wet, so use color tissue paper cautiously.
16 | Thank you notes
Thank you notes are a must in my book. They can be as simple as a thank you sticker or a Post-it note. As someone who loves stationery, I send hand-written thank yous on note cards to my buyers.

My current collection of thank you cards
17 | Packaging tape
If you ship items that require boxing, you’re likely to need packaging tape. Some USPS boxes are self-sealing but some are not. You’ll need packaging tape if you’re recycling boxes you received in the mail. I forgo the name brand stuff and buy this one, which has worked really well.
18 | Transparent tape
I forgo the name brand transparent tape and buy these rolls in bulk. This tape is great for when I wrap an item in tissue paper and for taping shipping labels onto mailers and boxes.
19 | Adhesive shipping labels
Some sellers prefer to use self-adhesive shipping labels. You can print directly onto the label and stick it on your package. No additional tape required.
20 | Copy paper
If you decide not to use adhesive shipping labels, you’ll need regular copy paper to print your labels. I stock up on this at Staples during back-to-school or Black Friday sales. You can get reams of paper for a dollar each.
21 | Printer
You’ll need access to a printer to print your shipping labels. There are ones that require ink and others that don’t.
Ink required - The main two are inkjet and laser printers. I have this HP Laserjet laser printer. It’s worth it for me because I don’t go through the toner very quickly as a part-time seller and can print out other documents I need.
No ink required - Thermal printers are very popular among high-volume sellers. They can print multiple labels in a row onto sticky labels and attach them right on to packages. The most popular brands are Rollo, Dymo, and Zebra.
Each brand and its models have different pros and cons, so look into each of them before deciding which to buy.
Thermal printers tend to be expensive. You might be able to find a used or refurbished one cheaper. Also be on the lookout for deals like Black Friday sales or at PoshFest.
Storing items
Storing items will depend on a number of things such as how much space you have and how many items you have to store. This is what I’ve seen for myself and other sellers.
22 | Clothes rack or closet
A first choice for storage of clothes and accessories may be an extra closet. If you don’t have that available to you, a clothes rack can be really helpful.
I use one for hanging and organizing items that I’m going to photograph or washed clothes that need to be line dried.
23 | Hangers
These thin velvet hangers are the best. They’re durable and clothes maintain their shape while staying on the hangers. Some sellers prefer wooden hangers because they look nice in photos.
24 | Storage bins
I store most of my items in storage bins because they can hold a lot and sit anywhere in the house. This is a good solution for sellers who have hundreds or thousands of items and need to stack them upwards or store them in the garage.
The above items are sure to make any reseller’s life easier, from taking better pictures for more attractive listings to quick packaging and shipping of sold items. I’m sure there’s more out there that I haven’t mentioned, which is why I'd like to hear from you.
Related posts you may like:
Which of the above items do you feel are essential to selling online? What other items do you use that I haven’t mentioned here?
Like this post? Click on the images below to save it to Pinterest!

